2.16.2010
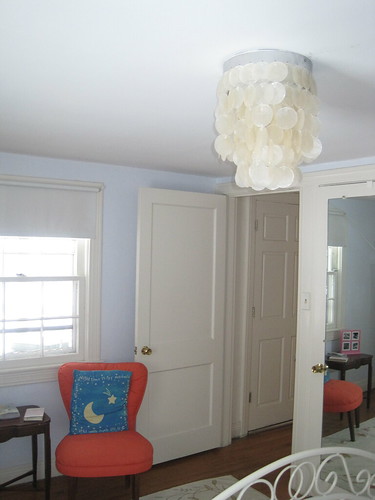
Wanted DIY: Capiz Chandelier
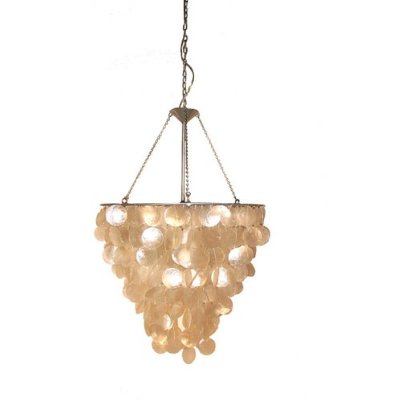
The only thing standing in my way was the price tag. Then, one lucky day I discovered a large capiz wind chime at the flea market. I snatched this baby up at the bargain basement price of $20. Sadly, I have no before pictures of the wind chime due to the fact that I actually cut the chime into pieces before leaving the store for easy handling.

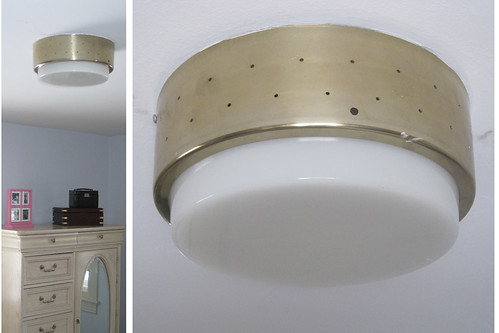
So I had the gorgeous, shimmery capiz shells, what next? I planned to use the existing light fixture in the bedroom as a base for stringing the shells.
The brassy gold fixture didn’t quite fit into my snazzy new look, so I spray painted the base with a brushed nickel finish.
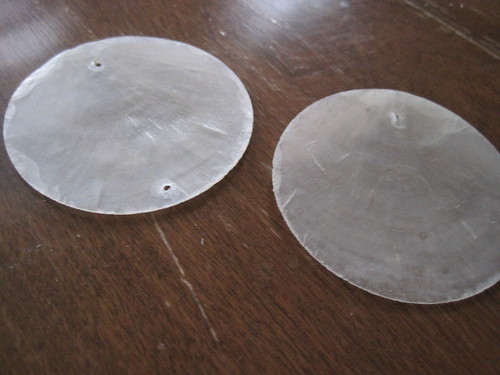
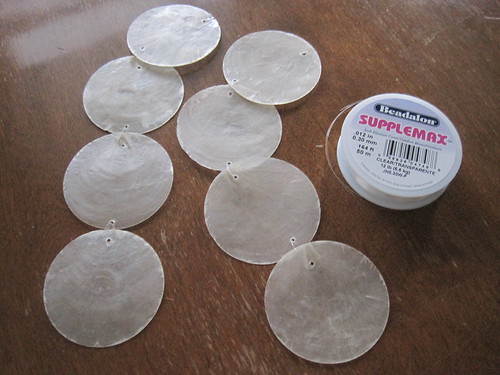
I carefully cut apart all of the shells so I could re-string them using monofilament. Each shell already had one hole from the wind chime strings, so I drilled a second whole so the shells would hang straight down rather than at an angle. I used a 1/16” drill bit for this part (this was the first time I got to use the cordless drill I got for Christmas!). Luckily, I got tired and stopped drilling after a bit. I used the shells with only one hole at the end of each strand so the fixture would look finished. Be warned: the drilling left a fine sparkly dust just about everywhere, so you may want to do this part in a workshop or garage.
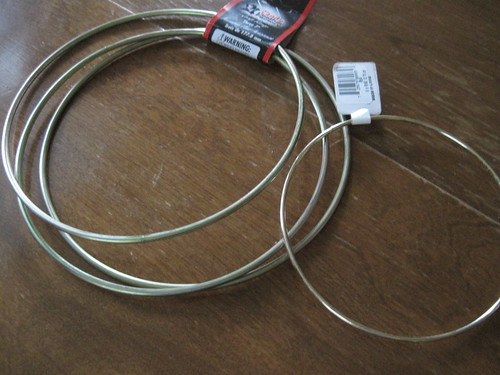
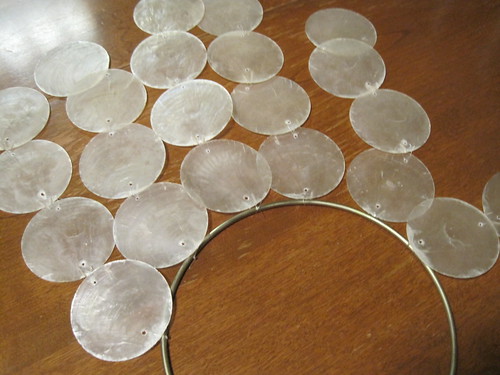
You’ll notice that the light fixture has a flat glass globe. I wanted my shells to hang beneath the fixture as well as around the perimeter, so I hunted for something on which to hang the shells beneath the globe. I found these metal rings in the leather working section at Michaels and they were just the thing! I got two sizes so my chandelier would have a little depth.
Then began the stringing. I measured how low I wanted my chandelier to hang, and then measured the shells to create the perfect length. My fixture has four shells per strand. This is definitely another benefit to making my own fixture because I could choose the size. My ceilings are only 7’, so I needed something a little shorter than most. I used monofilament to string each shell together. This took a little longer than I anticipated, but I’m glad I decided to re-string because the clear cord gave everything a more ethereal look.
I threaded the shells through the exiting holes on the outside of my light fixture base. I also tied strands (using the monofilament) to the metal rings.
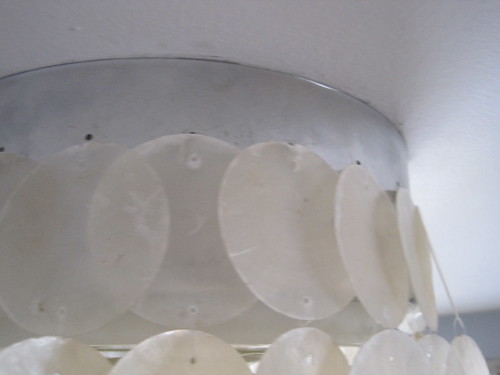
Next, I had to attach the metal rings to the light fixture base. This was pretty tricky. I actually screwed the base back into the ceiling (without the globe) to make things a bit easier since I didn’t have an extra pair of hands. I used monofilament to attach the metal rings to the lower holes in the base, but might try a thin gage wire to make things sturdier should I have to do this part over again.
I took the whole thing back down, re-installed the glass globe, and re-attached the whole fixture to the ceiling.
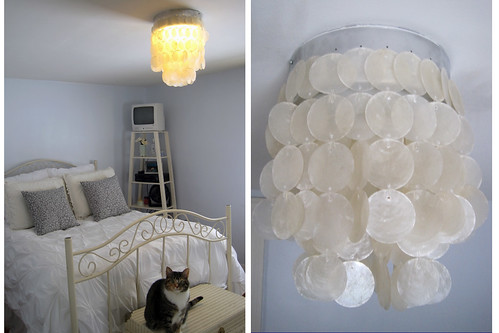
I must say, I am pretty pleased with my results. I love that the light fixture casts a romantic glow, and how chic I feel having a chandelier in my bedroom. The best part is that my new chandelier only cost me $25 in supplies! I actually have shells left over, so I am thinking of making a similar piece for the front porch this summer.
What do you think? Does it look anything like a store-bought chandelier?
DIY Disclaimer: I am by no means an expert DIY-er. I don’t always do things the “right” way, or even the “easy” way; I do however, enjoy myself and I am usually pleased with the results!
(images: Target; Megean)
Subscribe to:
Post Comments
(
Atom
)


About Me

I'm Megean. I'm in a love/hate relationship with my quirky old house, I love pastels and pop culture, and (in true internet fashion) I'm obsessed with my cat.
popular posts
-
Welcome back from the long weekend! To start things off with a bang this week I want to share what is probably my biggest DIY project to da...
-
 I was recently asked for some ideas on throwing a fab Stock the Bar party (my favorite kind of fete to throw before impending vows – couples...

Wow! This really pretty! Good job!
ReplyDeleteThanks Julia!
ReplyDeleteI love it! It looks so great. Also... cool chair. I'm on the hunt for a crazy good side chair... where did you find it?
ReplyDeleteK
Thanks! The coral-y pink chair came from the Peddlers Mall. And would you believe it, the chair was only $10!
ReplyDeleteI talked to Janet. She says she wants one for the condo.
ReplyDeleteThis looks amazing. I am really impressed.
ReplyDeleteWow! You did a great job! But that was a wicked cool ceiling fixture to begin with! I've never seen anything like that before!
ReplyDeletehow many shells were there when you bought them and did you use them all? I love this idea and have been looking at something similar at Vivaterra.
ReplyDeleteThere were around 225 shells on the wind chime. I used around 175, and I have another, smaller project in mind for the rest. I suggest measuring how low you want your fixture to hang, and how many strands will hang around the circumference to determine how many shells you will need. My shells were about 3 inches in diameter, and I did 2 tiers of shells with 4 shells on each strand. Good luck, and be sure to let me know how things turn out!
ReplyDeleteThis is fabulous! My cousin sent me about 300 pre-drilled capiz shells so that I could make a chandelier but I haven't tackled the project yet. How exactly did you string the capiz onto the monafilament? In my attempts, I've found that the shells start sliding down onto each other. Thanks!
ReplyDeleteThanks! I drilled two wholes into each shell, so there is a separate string on the top and the bottom (like little links). I triple knotted the links, because they do tend to slip a little. I hope that helps! Let me know how things turn out - I'd love to see a photo.
ReplyDeleteDefinitely not a store-bought chandelier! You did a really great job! What you did was quite impressive, Maegan. We had to call an electrician to help us with our new light fixture last Holiday, and your work made me wanna do the redesigning myself in our house in Twin Cities. Thanks! And yes, capiz is one of the best materials for decorations.
ReplyDeleteThat looks amazing!
ReplyDeleteAbsolutely beautiful! I am attempting to make a wind chime but having difficulties on tying the monofilament thread on to hoop. Do you have ideas to share? Thank you
ReplyDeleteTe quedo bella, siempre he querido hacer una pero no sé dónde se consigue la con ha.
ReplyDeleteWow, the after shot of the chandelier is stunning. This must have taken quite a bit of time (and planning). Great job!
ReplyDeleteoutdoor lighting installation st catharines