Showing posts with label DIY. Show all posts
Showing posts with label DIY. Show all posts
6.18.2014
Let's Make a Ruffle Cake

Are kids different these days? Have they changed since the golden age of The Baby-sitters Club? I'm pretty far removed, but it seems like they're all into Justin Bieber and Snapchat.
Oh, too scandalous for a first birthday? Good. We can focus on the innocence of ruffles and flowers instead. Much more my speed.

When Emily's mom asked me if I could do a ruffle cake for her first birthday it sounded like a fun challenge. (Unlike running, which is not a fun challenge.) I did a test run (or three) to get my technique just right, and to determine which size piping tip to use.

You won't find a step-by-step tutorial here (this one is a good primer, though). You will find loads of encouragement and a few tips.
Tips for Ruffle Cake Success
- Use a turntable. You want to be able to spin the cake with one hand and pipe the icing with the other.
- Don't skip the crumb coat!
- Spend some time getting the icing consistency just right. It should be stiff enough so the ruffles stand out, but soft enough so they don't crack. This is where a test run (or a few practice ruffles) can really help.
- Choose the right piping tip. I landed on a Wilton #104 and kept the fat end closest to the cake.
- Start at the bottom and work your way up. Then you get a nice ruffly center!
- Optional: Pump some Mariah Carey in the background. Preferably off the Daydream album.

That's it! Trust me, if I can tackle a ruffle cake, you can too. I think these ruffles are definitely Emily's style. And I hear she's into smash cakes instead of Snapchat. I just can't keep up.
images: ©J. Bennett Kincaid Photography for wanted.

5.07.2014
Start a Vegetable Garden from Seeds

I'm a little late to the game, but I started the seeds for my raised beds last weekend. I used this method to start my seeds last year, and if I can do it, anyone can! But seriously, go back in time and start your seeds like a month ago.
Fair warning, the name of the game here is use what you got. This is not one of those fancy blog posts where everything's styled to perfection and darling seedlings are sprouting out of pastel egg shells (wouldn't that be cute?). I use toilet paper tubes to start my seeds. Paper towel rolls will work too, but they tend to fall apart. Cut the tube in half and pack in some potting soil or compost. Leave a bit of room at the top to pop in your seeds.

I ordered seeds from Burpee because I was looking for San Marzano tomatoes, but you can find a good variety at most garden centers and home improvement stores. Read the back of the seed packet for information about how many seeds you should sow together, and how deep they need to be. Pop in your seeds and top with more soil. I find that using a spray bottle to water helps at this stage, especially since my other watering can is a solo cup (fancy, see?).

Once your seedlings have sprouted and are hardy enough to plant outside, you can just pop in the whole whole tube. The cardboard will compost in your garden.

I planted San Marzano tomatoes, yellow squash, cucumbers, two types of basil and lavender. The basil and lavender will stay in pots on my sun porch for the time being. Since lavender is so elegant I added labels to the terra cotta pots using a chalk marker. This is a blog after all.
How about you - are you growing anything this summer?
images: Megean
4.24.2014
Ice Cream Sundae in a Box

I don't know about you, but I'm not the greatest gift-giver. I never remember to pick things up when I see something my loved ones would like, and I'm forever stumped when the gift-giving occasion rolls around. This Sundae in a Box is a perfect go-to if you're struck with gift-giver's block. It's the perfect DIY, ships easily and is sure to please.
I packaged this version up for my cousin's birthday. These sundae ingredients are a good start, but get creative! As an ice cream connoisseur I can assure you, toppings options are endless. Be sure to include cute accoutrements like ice cream cups, spoons, striped paper straws (a must for any party), and party hats.
Pack everything in a cute box with tissue and instructions and you're in business.
Have you given any great gifts lately? I'm always looking for ideas!sundae in a box
- Ramekins
- Spoons
- Cherries
- Hot Fudge Sauce
- Sprinkles
- Ice Cream Cones
images: Megean
3.12.2013
Wanted DIY: Painted Dresser to Buffet
A few months ago my parents were upgrading their bedroom furniture and I adopted this dilapidated dresser. It sat, waiting for its destiny in my hoarder's room guest room. Suddenly, I found myself in need of some extra storage in the kitchen and the junky dresser found its purpose in life. Oh yeah, I forgot to take a before picture, so you'll just have to deduce the ugly from this one.

There are tons of great furniture painting tutorials out there, so I'll just tell you, in brief, my method for this particular project. I took out all the drawers and sanded the whole piece lightly by hand. I used wood filler to make some minor repairs and fill in some scratches and then sanded again. Then I primed. I used a small foam roller and a 2-inch brush to tackle the details. Oh, and I didn't take a picture of the priming either. You'll have to imagine that too.
Many brands of paint offer a paint/primer combo, but I thought I would play it safe and I'm glad I did. It still took several coats of paint to get a nice finish.

The kitchen is pretty dark (with all that wood paneling - a project for another day), so I wanted something bright and cheery. I chose Safflower by Olympic. It's a rich coral, but in some light takes on a neon hue that makes me feel pretty trendy. I love it.


There you have it! A painted dresser turned bright buffet. The storage is great - odds and ends, kitchen linens, canning jars and cookie cutters all found a home.
Have you tackled any painting projects lately?
Images: Megean
Read More
There are tons of great furniture painting tutorials out there, so I'll just tell you, in brief, my method for this particular project. I took out all the drawers and sanded the whole piece lightly by hand. I used wood filler to make some minor repairs and fill in some scratches and then sanded again. Then I primed. I used a small foam roller and a 2-inch brush to tackle the details. Oh, and I didn't take a picture of the priming either. You'll have to imagine that too.
Many brands of paint offer a paint/primer combo, but I thought I would play it safe and I'm glad I did. It still took several coats of paint to get a nice finish.
The kitchen is pretty dark (with all that wood paneling - a project for another day), so I wanted something bright and cheery. I chose Safflower by Olympic. It's a rich coral, but in some light takes on a neon hue that makes me feel pretty trendy. I love it.
There you have it! A painted dresser turned bright buffet. The storage is great - odds and ends, kitchen linens, canning jars and cookie cutters all found a home.
Have you tackled any painting projects lately?
Images: Megean
2.11.2013
Wanted: Last-Minute Valentines
Valentine's Day is right around the corner, are you ready? If you need to whip up some last-minute valentines, try these! Just grab some buttons, cardstock, and crayons (if you're into being extra cutesy, which clearly I am).

These are perfect for someone special, your mom, your coworker, your postman, your bank-teller boyfriend (what, you don't have one of those?).

I love using literal interpretations of lovey-dovey sayings on my valentines. Check out more examples here and here.

Are you doing anything special for your valentine(s) this year?
Images: Megean
Read More
These are perfect for someone special, your mom, your coworker, your postman, your bank-teller boyfriend (what, you don't have one of those?).
I love using literal interpretations of lovey-dovey sayings on my valentines. Check out more examples here and here.
Are you doing anything special for your valentine(s) this year?
Images: Megean
8.16.2012
Wanted: Third Blogiversary
Three years ago today I started a blog. For my 100th post I took a look back at my top five posts, so for this very special occasion I thought it would be fun to see what people are searching for most when they land here on WANTED. What I've found might surprise you.
Without further ado, the most searched for terms on WANTED:

Quite a while ago, I helped my friend Meg throw a Stock the Bar Party for her darling sister and now brother-in-law. The signature drinks, spiced almond favors, and cute cobblers in jars were a huge hit!


First mentioned here, "Dexter Henley" pleases me to no end when it shows up in the top searches. Thank you, internet, for supporting this gorgeous (though ominous) apparel. Still, the hardest working shirt in the biz.


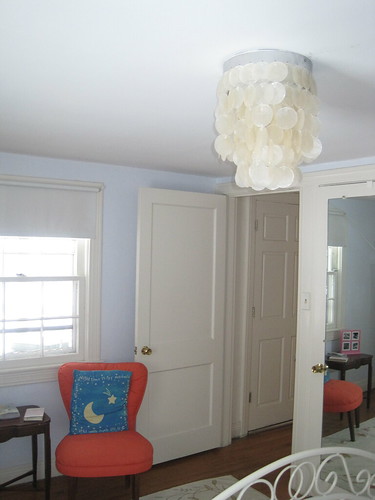
One of my greatest DIY triumphs, the Capiz Chandelier in my bedroom is still rocking. The stringing was tedious, but totally worth it. Check out the tutorial if you'd like to attempt one of your very own.
Thanks for reading! Let's hope that the coming year brings even more support for the often-overlooked henley.
images: Megean, TVGuide
Read More
Without further ado, the most searched for terms on WANTED:
Quite a while ago, I helped my friend Meg throw a Stock the Bar Party for her darling sister and now brother-in-law. The signature drinks, spiced almond favors, and cute cobblers in jars were a huge hit!
First mentioned here, "Dexter Henley" pleases me to no end when it shows up in the top searches. Thank you, internet, for supporting this gorgeous (though ominous) apparel. Still, the hardest working shirt in the biz.
One of my greatest DIY triumphs, the Capiz Chandelier in my bedroom is still rocking. The stringing was tedious, but totally worth it. Check out the tutorial if you'd like to attempt one of your very own.
Thanks for reading! Let's hope that the coming year brings even more support for the often-overlooked henley.
images: Megean, TVGuide
8.03.2012
Most Wanted
What a week! I returned from Colorado last weekend and promptly fell ill. It must be that fresh mountain air. I spent much of my week sleeping, rather than blogging or reading blogs. So, I leave you with this too-sweet-for-words centerpiece from the Colorado wedding. (The wedding took place at the top of a mountain, at a historic mining town!)

Have a restful weekend!
images: Megean
Read More
Have a restful weekend!
images: Megean
7.25.2012
Wanted Bathroom Week: Fixing A Tile Disaster
So, back in October this happened.

A whole bunch of tiles fell off the wall in my bathroom. Yep, I was in the shower at the time. It was traumatic and I don’t want to talk about it. There are a few reasons why tile might fall off of a wall. Namely, moisture got back there. My bathroom hasn’t been updated. Ever. Some of the caulk and grout were cracking, and I think that is where the issue occurred.
I explored a few options for repair: replacing the whole shebang with a liner, installing a vinyl liner right over the tile disaster, and retiling. I’d rather keep my tile than install a liner, and adding vinyl over the existing problem didn’t seem like the right way to go. I’ll be the first to say, this isn’t a permanent solution. If the moisture got back there to begin with then there might be some bigger damage that I can’t see. However, a gut renovation just isn’t in the cards right now. So, I chose option three – retiling.
I did a lot of research, and by research I mean I read this blog post, watched some youtube videos, and asked an annoying amount of questions at Lowe's. This is not a step-by-step tutorial. Consider this an inspirational anecdote. If I can tile (all by myself, I might add), then so can you.
Here are the basic steps:
Remove all loose tiles, clean the area, and clean the tiles (this includes chipping off the grodie old thinset off the back).


Apply thinset using a notched trowel and attach the tile. (I picked up all of these supplies at Lowe's. Seriously, I said, “Give me everything I need to tile.” and walked away with about $80 in supplies. They helped me out a bunch – I really feel like we built something together.) I probably could have done making sure they were flush/flat against the wall. I should also note at this point that I used a mix of old tiles that fell off, and a few replacement tiles I had in the attic. The last few tiles were a beast, since things weren’t lining up as evenly as they should have. I had to practically pound them in there, and was worried that the rest of the tiles would fall in. This was one of two steps that ended in tears – just keeping it real.


Next comes grouting, which was way better than I thought it would me. I was pretty nervous about mixing and getting the consistency right, but this was the easiest part of the whole thing. After the grout sets up, you go over it with this nice soft sponge that makes a huge difference in smoothing out the lines.

After the grout cured for a few days, I was able to add the soap dish back on. This led to crying moment number two. I used Liquid Nails to add the soap dish, and then caulked around the edges. Until the Liquid Nails sets up, you have to tape that sucker to the freshly applied tiles. This was terrifying, and awful. I decided to use packing tape because I didn’t want to hurt my new tile job (and then later because I couldn’t find the duct tape). I can still hear the crinkle of the tape as it slowly came undone. I probably used a whole roll to keep the soap dish up overnight, long enough for it to dry.

Lastly, comes caulking and sealing. I used the painters tape trick to make a clean caulk line, and it definitely helped. You’d think that would be the easiest part, but caulk is messy stuff and hard to get perfect if you’ve never used it before. And this is what it looks like today!

Is it perfect? No. Am I proud as hell? You bet. I know this isn’t a long-term job, but I’m pretty pumped about what I did with what I had available.
How about you? Have you tackled a tile job before? What proud DIY projects have you conquered lately?
images: Megean
Read More
A whole bunch of tiles fell off the wall in my bathroom. Yep, I was in the shower at the time. It was traumatic and I don’t want to talk about it. There are a few reasons why tile might fall off of a wall. Namely, moisture got back there. My bathroom hasn’t been updated. Ever. Some of the caulk and grout were cracking, and I think that is where the issue occurred.
I explored a few options for repair: replacing the whole shebang with a liner, installing a vinyl liner right over the tile disaster, and retiling. I’d rather keep my tile than install a liner, and adding vinyl over the existing problem didn’t seem like the right way to go. I’ll be the first to say, this isn’t a permanent solution. If the moisture got back there to begin with then there might be some bigger damage that I can’t see. However, a gut renovation just isn’t in the cards right now. So, I chose option three – retiling.
I did a lot of research, and by research I mean I read this blog post, watched some youtube videos, and asked an annoying amount of questions at Lowe's. This is not a step-by-step tutorial. Consider this an inspirational anecdote. If I can tile (all by myself, I might add), then so can you.
Here are the basic steps:
Remove all loose tiles, clean the area, and clean the tiles (this includes chipping off the grodie old thinset off the back).
Apply thinset using a notched trowel and attach the tile. (I picked up all of these supplies at Lowe's. Seriously, I said, “Give me everything I need to tile.” and walked away with about $80 in supplies. They helped me out a bunch – I really feel like we built something together.) I probably could have done making sure they were flush/flat against the wall. I should also note at this point that I used a mix of old tiles that fell off, and a few replacement tiles I had in the attic. The last few tiles were a beast, since things weren’t lining up as evenly as they should have. I had to practically pound them in there, and was worried that the rest of the tiles would fall in. This was one of two steps that ended in tears – just keeping it real.
Next comes grouting, which was way better than I thought it would me. I was pretty nervous about mixing and getting the consistency right, but this was the easiest part of the whole thing. After the grout sets up, you go over it with this nice soft sponge that makes a huge difference in smoothing out the lines.
After the grout cured for a few days, I was able to add the soap dish back on. This led to crying moment number two. I used Liquid Nails to add the soap dish, and then caulked around the edges. Until the Liquid Nails sets up, you have to tape that sucker to the freshly applied tiles. This was terrifying, and awful. I decided to use packing tape because I didn’t want to hurt my new tile job (and then later because I couldn’t find the duct tape). I can still hear the crinkle of the tape as it slowly came undone. I probably used a whole roll to keep the soap dish up overnight, long enough for it to dry.
Lastly, comes caulking and sealing. I used the painters tape trick to make a clean caulk line, and it definitely helped. You’d think that would be the easiest part, but caulk is messy stuff and hard to get perfect if you’ve never used it before. And this is what it looks like today!
Is it perfect? No. Am I proud as hell? You bet. I know this isn’t a long-term job, but I’m pretty pumped about what I did with what I had available.
How about you? Have you tackled a tile job before? What proud DIY projects have you conquered lately?
images: Megean
7.23.2012
Wanted Bathroom Week: Bathroom Makeover
It’s been too long, friends. And, I’ve been hoarding projects to share with you, which is just too selfish of me. Let’s get started! Being the classy lady that I am, and since this is a classy blog, I hereby declare this bathroom week!
I figured we’d go back to the very beginning. Back before I had a blog. Before I had a decent camera, and before I had the gumption to redo the bathroom.


There she is, in all her glory. I have the tiniest little bathroom. Just before I moved into my precious house, we discovered a leak in the bathroom ceiling. The paint cracked and began to peel, and it was downhill from there. Over time, since my bathroom doesn’t have a vent and the ceilings are so low, the moisture caused even more damage to the walls and ceilings. It was time for action.
I patched up and repainted the ceiling. Took down the dated (and broken) medicine cabinet, painted and added some fresh new details like a new shower curtain, a vintage mirror, and art. I was hesitant to go with the dark gray paint, but I’m glad I did. It’s a small space, so it was fun to be bold, and I think it classes up the vintage blue tile a bit.

The mirror was originally gold, but I ended up painting it white. (note my sweet friend, Meg, she’s getting married this weekend!)
The art on the wall is actually two framed vintage hankies. I love the vintage details that showcase my dear old house, and the modern nods that keep things fun. What do you think?
images: Megean
Read More
There she is, in all her glory. I have the tiniest little bathroom. Just before I moved into my precious house, we discovered a leak in the bathroom ceiling. The paint cracked and began to peel, and it was downhill from there. Over time, since my bathroom doesn’t have a vent and the ceilings are so low, the moisture caused even more damage to the walls and ceilings. It was time for action.
I patched up and repainted the ceiling. Took down the dated (and broken) medicine cabinet, painted and added some fresh new details like a new shower curtain, a vintage mirror, and art. I was hesitant to go with the dark gray paint, but I’m glad I did. It’s a small space, so it was fun to be bold, and I think it classes up the vintage blue tile a bit.
The mirror was originally gold, but I ended up painting it white. (note my sweet friend, Meg, she’s getting married this weekend!)
The art on the wall is actually two framed vintage hankies. I love the vintage details that showcase my dear old house, and the modern nods that keep things fun. What do you think?
images: Megean
2.14.2012
Wanted: A Sweet Valentine
It's been a while, friends, but I had to stop in to share the love on one of my favorite holidays. I hope that your Valentine's Day has been lovely and filled with pretty, sweet, pink things.


Happy Valentine's Day!
xoxo,
Megean
images: Megean
Read More
Happy Valentine's Day!
xoxo,
Megean
images: Megean
10.12.2011
unWanted: Bathroom Tile Disaster
I was all set to write about the interiors seen in What's Your Number (surprisingly chic, by the way), but I suddenly find myself dealing with a bit of a mess.
Yep, those are the tiles of my one and only bathroom that came crashing down in the shower this morning. Plus, most of the other tiles are loose around the gaping hole. I'll be spending the next few days researching things like moisture barriers, thinset, mastic, grout, and hunting down the spare tiles I'm praying are in the attic. Stay tuned for my DIY fix - it's sure to be entertaining.
Have any restoration ideas for me? I'm listening!
images: Megean
Read More
Yep, those are the tiles of my one and only bathroom that came crashing down in the shower this morning. Plus, most of the other tiles are loose around the gaping hole. I'll be spending the next few days researching things like moisture barriers, thinset, mastic, grout, and hunting down the spare tiles I'm praying are in the attic. Stay tuned for my DIY fix - it's sure to be entertaining.
Have any restoration ideas for me? I'm listening!
images: Megean
10.03.2011
Wanted: Striped Floors
After a tremendous amount of firsthand experience with some vinyl tape, I think I’m fully prepared to tackle a DIY striped floor modeled after this fab Kate Spade floor.

I was pretty intimidated by taping such a precise pattern on the floor, but I’ve discovered that vinyl tape is pretty forgiving. It’s got a bit of stretch, you see. And it comes in tons of colors and widths! You can find it with a quick Google search, or find a good start here.
I’m thinking the kitchen, or a small area in the living room. Or, maybe I have some willing/adventurous friends that will let me have a go at their floor?
What do you think of striped floors? Do you have any experience with vinyl tape?
images: via Decor Hacks
Read More
I was pretty intimidated by taping such a precise pattern on the floor, but I’ve discovered that vinyl tape is pretty forgiving. It’s got a bit of stretch, you see. And it comes in tons of colors and widths! You can find it with a quick Google search, or find a good start here.
I’m thinking the kitchen, or a small area in the living room. Or, maybe I have some willing/adventurous friends that will let me have a go at their floor?
What do you think of striped floors? Do you have any experience with vinyl tape?
images: via Decor Hacks
9.28.2011
Wanted: Driftwood Accessories
Even though I have a fantastic capiz chandelier, my home could hardly be described as “beachy.” I’m totally landlocked, but lately I’ve been drawn to driftwood. It’s so smooth and pretty.

First it was a super driftwood starburst that I pinned (btw, are you following me on Pinterest?). It seems totally DIY-able.

Then, I spotted a driftwood piece from ZGallerie on Jen’s new floating buffet. Doesn’t it seem like it has a great story behind it? Like it was found on a beautiful day during a family adventure.

And then there’s this unique driftwood sphere I spotted at the flea market. Have you ever seen such a thing?
I think, since I’m unlikely to find some cool driftwood on a family adventure, I might go the DIY route. Maybe frame out a cool mirror or create a dramatic centerpiece. I think it’d be really great paired with some twinkle lights with the approaching holiday season. Now, where to find some driftwood pieces in my landlocked state.
Have you noticed a driftwood trend lately, or is it just a convergence in my own little universe?
images: via Pinterest, MadebyGirl, Megean
Read More
First it was a super driftwood starburst that I pinned (btw, are you following me on Pinterest?). It seems totally DIY-able.
Then, I spotted a driftwood piece from ZGallerie on Jen’s new floating buffet. Doesn’t it seem like it has a great story behind it? Like it was found on a beautiful day during a family adventure.
And then there’s this unique driftwood sphere I spotted at the flea market. Have you ever seen such a thing?
I think, since I’m unlikely to find some cool driftwood on a family adventure, I might go the DIY route. Maybe frame out a cool mirror or create a dramatic centerpiece. I think it’d be really great paired with some twinkle lights with the approaching holiday season. Now, where to find some driftwood pieces in my landlocked state.
Have you noticed a driftwood trend lately, or is it just a convergence in my own little universe?
images: via Pinterest, MadebyGirl, Megean
5.31.2011
Wanted: Yard Makeover
If you’ll think back to 2010, you may remember that I made a few home resolutions for the year. One of which was to get my landscaping under control. I totally tout the “freedom lawn” approach, a.k.a. the “I don’t know what I’m doing so I’ll just let it grow” approach. After a year of somewhat disastrous lawn maintenance I had a few thoughts about what I wanted to do with my yard. Consider this my first step to a complete yard makeover.

My freedom lawn comes complete with packed-tight shrubs, weeds everywhere (some the size of trees!), random bricks, stones, and concrete, and little to no definition. Armed with some new flowers, a few boxwoods, herbs and vegetables, and about a billion pounds of mulch, I went to work on the great planting weekend of 2011.

Before I moved in some small shrubs had been planted along the front of the house. There were far too many of them and they were too close together. Cut to 3 years later – I finally took the plunge and moved every other shrub (13 all together!). Some were moved to the side of the house, and some to the back.

I also added a couple of boxwoods, potted my patio vegetable and her garden, and planted one lone zinnia (a total impulse buy at the nursery). As a final touch I spread mulch around the front and the back to add definition and keep some of the weeds at bay.

You may notice a stack of stones that I dug up in the back yard. I am thinking of using them as a start for a small patio behind my screened-in porch at the back.
What do you think? There’s still so much to be done, but I hope it’s a good start. And, as with everything, I’m sure I’ll change my mind about how I want things to look in the not-too-distant future.
images: Megean
Read More
My freedom lawn comes complete with packed-tight shrubs, weeds everywhere (some the size of trees!), random bricks, stones, and concrete, and little to no definition. Armed with some new flowers, a few boxwoods, herbs and vegetables, and about a billion pounds of mulch, I went to work on the great planting weekend of 2011.
Before I moved in some small shrubs had been planted along the front of the house. There were far too many of them and they were too close together. Cut to 3 years later – I finally took the plunge and moved every other shrub (13 all together!). Some were moved to the side of the house, and some to the back.
I also added a couple of boxwoods, potted my patio vegetable and her garden, and planted one lone zinnia (a total impulse buy at the nursery). As a final touch I spread mulch around the front and the back to add definition and keep some of the weeds at bay.
You may notice a stack of stones that I dug up in the back yard. I am thinking of using them as a start for a small patio behind my screened-in porch at the back.
What do you think? There’s still so much to be done, but I hope it’s a good start. And, as with everything, I’m sure I’ll change my mind about how I want things to look in the not-too-distant future.
images: Megean
2.14.2011
Wanted: A DIY Balloon Valentine
I just love Valentine's Day. It's a magical, rosy, sweet-filled day of delight. What's not to love? This year, I whipped up some DIY valentines for all of my sweethearts on the cheap.

I wrote a sweet message on some cardstock. And attached a balloon. That's it. Sometimes it's the simple projects I like best.
Did you send Valentine's to your loved ones this year? I'd love to hear about them! Hope you had the sweetest day ever!
images: Megean
Read More
I wrote a sweet message on some cardstock. And attached a balloon. That's it. Sometimes it's the simple projects I like best.
Did you send Valentine's to your loved ones this year? I'd love to hear about them! Hope you had the sweetest day ever!
images: Megean
1.26.2011
Wanted: Easy Kitchen Fixes
I started sharing some before pictures of my house, and some of the small progress I’ve made on making it my own. Remember that awful green carpet? Well, the kitchen was pretty bad too. It was dark, and filled with wood. Wood paneling everywhere you looked!

I immediately took down the heavy, brick-colored curtains and roller shades and whipped up some easy curtains in a cheerful robin’s egg blue polka dot. The new curtains let in tons of light and were the single best improvement I made to the kitchen.

I haven’t been able to paint the paneling or the cabinets yet (though I’m dying to), but I did take down some cabinet doors to create some open shelving. I love the look and I love showing off some of my dishes. This easy project did a lot to break up all of the wood.

Besides painting, I have a few other tasks up my sleeve, including a new dining table in the near future. I’m thinking rustic farm table paired with some sleek modern (maybe metal) chairs. Stay tuned!
P.S. – remember the DIY disaster that was adding a tip-out drawer under the sink? If you haven't checked it out you're in for a treat.
Do you have any easy updates for the kitchen? I’d love to hear them!
images: Megean
Read More
I immediately took down the heavy, brick-colored curtains and roller shades and whipped up some easy curtains in a cheerful robin’s egg blue polka dot. The new curtains let in tons of light and were the single best improvement I made to the kitchen.
I haven’t been able to paint the paneling or the cabinets yet (though I’m dying to), but I did take down some cabinet doors to create some open shelving. I love the look and I love showing off some of my dishes. This easy project did a lot to break up all of the wood.
Besides painting, I have a few other tasks up my sleeve, including a new dining table in the near future. I’m thinking rustic farm table paired with some sleek modern (maybe metal) chairs. Stay tuned!
P.S. – remember the DIY disaster that was adding a tip-out drawer under the sink? If you haven't checked it out you're in for a treat.
Do you have any easy updates for the kitchen? I’d love to hear them!
images: Megean
Subscribe to:
Posts
(
Atom
)


About Me

I'm Megean. I'm in a love/hate relationship with my quirky old house, I love pastels and pop culture, and (in true internet fashion) I'm obsessed with my cat.
popular posts
-
Welcome back from the long weekend! To start things off with a bang this week I want to share what is probably my biggest DIY project to da...
-
 I was recently asked for some ideas on throwing a fab Stock the Bar party (my favorite kind of fete to throw before impending vows – couples...
